
Blog Posts

Get Spooky & Sweet: Easy Clay Ghosts & Pumpkins for Your Apartment!-image

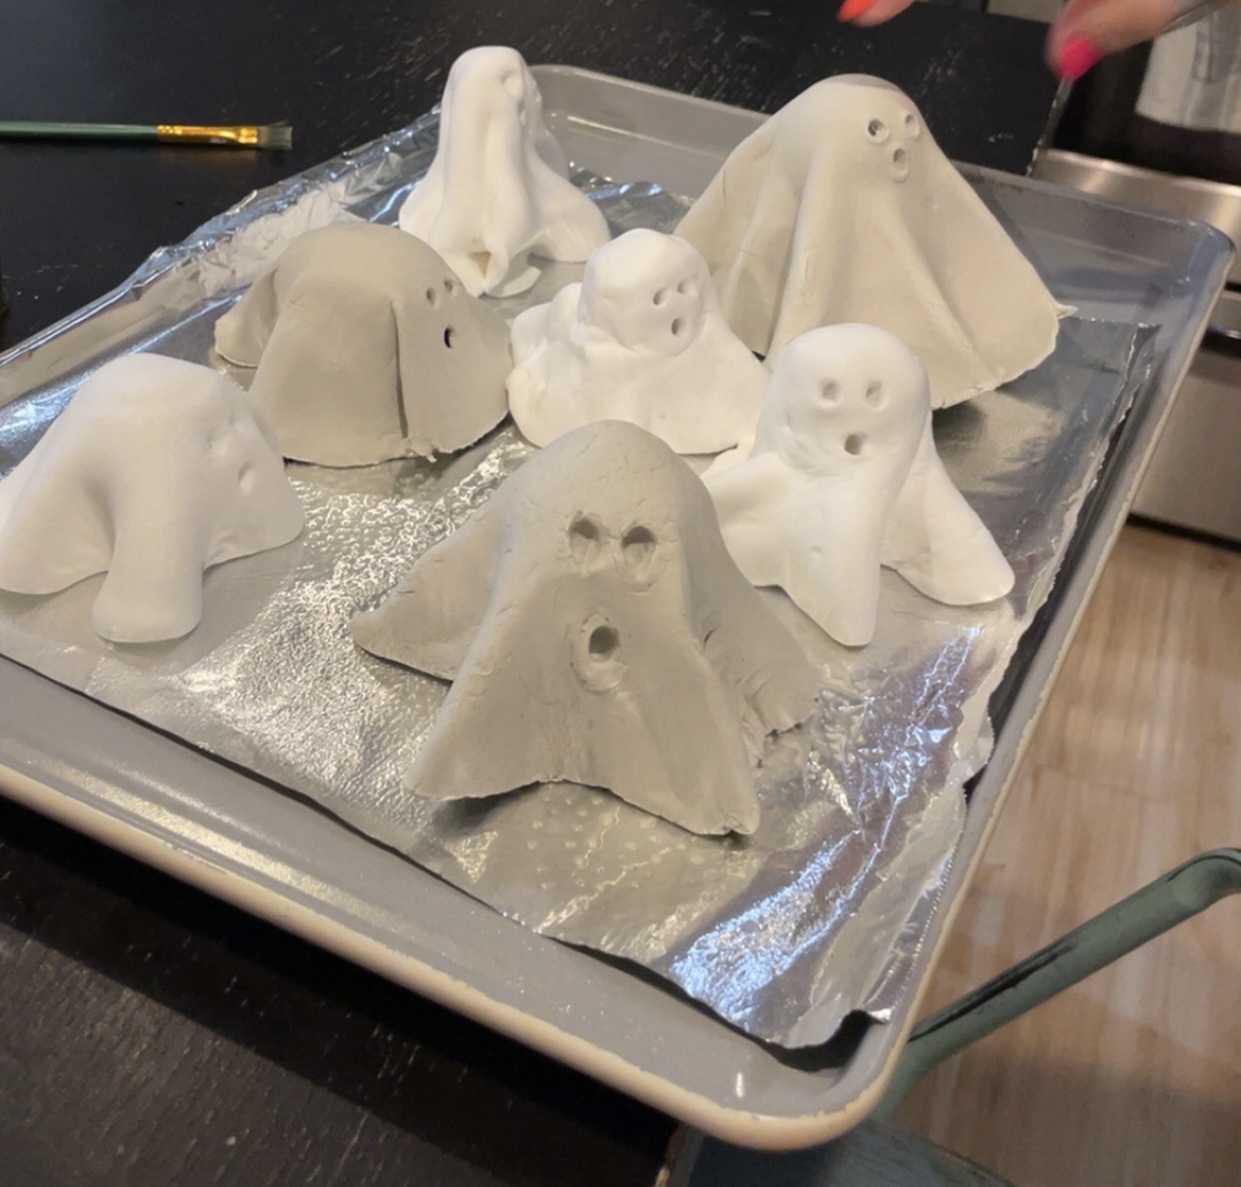
There’s something truly charming about handmade decorations, especially when they bring a touch of autumn magic (and a little spookiness!) to your home. This fall, why not try your hand at crafting adorable clay ghosts and pumpkins? They're super simple to make, don't require any fancy equipment, and are perfect for adding a personalized, renter-friendly touch to your apartment. You can use air-dry clay, which cures without baking, making it incredibly convenient for apartment crafting! Above pictured are the ones I made!   What You'll Need:   Air-Dry Clay: White clay for ghosts, and orange/terra cotta clay for pumpkins (or white clay you can paint later). You can find this at any craft store. Clay Tools: A plastic knife, toothpick, or small sculpting tools (a butter knife or even your fingers work great!). Cutting Surface: A clean mat, parchment paper, or cutting board to protect your table. Water: A small bowl for dipping your fingers to smooth the clay. Optional for Ghosts: Black permanent marker or paint for faces. Optional for Pumpkins: Brown or green paint for stems, and maybe some fall-colored acrylic paints for detailing. Optional for Finishing: Clear sealant spray (matte or glossy) for durability.   Crafting Clay Ghosts 👻   These little apparitions are incredibly easy and wonderfully charming! Shape the Body: Take a piece of white air-dry clay and roll it into a ball. Then, gently pinch and pull one end to form a tapered head, leaving the bottom wider and flat so it can stand. Create the Drape: With your fingers, gently flatten and flare out the bottom edge of the ghost to create a flowing, ethereal shape, like a sheet blowing in the wind. You can make little ripples and waves along the bottom for more character. Form the Arms (Optional): If you want your ghost to have arms, gently pull out two small nubs of clay from the sides of the body and shape them into simple arm-like forms. You can pose them as if waving or floating. Smooth It Out: Dip your finger in water and gently rub over any cracks or rough spots to smooth the surface of your ghost. Add a Face: Use a toothpick or the blunt end of a small tool to gently indent small eye and mouth shapes. Alternatively, you can wait until the clay is dry and draw on faces with a black permanent marker or paint. Let it Dry: Place your ghost on parchment paper to dry. Depending on the thickness and humidity, this can take 24-72 hours. Flip it occasionally to ensure even drying.   Crafting Clay Pumpkins 🎃   From cute mini pumpkins to rustic gourds, these clay creations are perfect for fall. Form the Base: Roll a piece of orange (or desired color) air-dry clay into a smooth ball. Create Pumpkin Shape: Gently flatten the top and bottom slightly. Use your finger or a dull knife to press vertical indentations from the top center to the bottom center all the way around, creating those classic pumpkin segments. Add a Stem: Take a small piece of clay (you can use green or brown clay, or paint it later) and roll it into a short cylinder or a twisted vine shape. Attach it firmly to the top center of your pumpkin, blending it slightly. You can use a tiny bit of water to help it adhere. Add Character (Optional): If you want a more rustic look, use a toothpick to create small lines or textures on the stem. You can also vary the shapes—some round, some squat, some taller like gourds! Smooth It Out: Use a damp finger to smooth any rough edges or blend the stem connection. Let it Dry: Place your pumpkin on parchment paper to dry completely, typically 24-72 hours. Paint & Seal (Optional): Once dry, you can paint your pumpkins with acrylic paints for more vibrant colors or add details. Once painted and dry, a clear sealant spray will protect your creations and give them a finished look. Once your clay creations are dry, arrange them on your mantel, bookshelf, or as part of a centerpiece. They add a charming, handmade touch that celebrates the season without any fuss. Happy crafting, and enjoy your delightfully spooky (and sweet!) apartment decor!

Read more


The Best Spots for a Cozy Day Out-image

October is here, and with the crisp Idaho Falls air, there’s nothing better than finding a warm, inviting spot to relax with a good book or great company. Luckily, our city has plenty of cozy nooks perfect for a night out. We’ve curated a list of our favorite local gems, all just a quick trip from your front door at The Residences At First Street For the Book Lovers & Coffee Aficionados   Winnie & Mo's Bookshop Vibe: A true literary haven. This charming independent bookshop offers a warm, quiet atmosphere where you can get lost in the shelves. They even have a coffee and tea bar, making it the perfect one-stop shop for a peaceful evening. It's the kind of place you go to escape the world for a few hours. Distance: Located at 343 A St, Idaho Falls, ID 83402. It’s a short drive to downtown from most areas of Idaho Falls. Zz Coffee Vibe: This is my personal favorite place to visit in the fall. If you are looking for the perfect cozy coffee shop, you've found it. There is a plant shop located in the coffee shop with plenty of seating available to sit and read, finish up work, or chat with friends. On Sundays from 9-12, they serve a coffee flight with their monthly limited flavors. For example, September's flavors were pumpkin banana bread, salted caramel chip, maple almond, and caramel apple matcha. HOW YUM!  Distance:   545 Shoup Ave, Idaho Falls, ID 83402   For a Hearty Meal & Warm Drinks   The Celt Pub & Grill Vibe: Step into a true Irish pub experience right in the heart of downtown. The Celt offers a rustic, inviting atmosphere with a fireplace, dark wood, and a menu of classic pub fare. It’s the ideal spot to warm up with a hearty meal and a pint after a chilly day. Distance: Situated at 398 W Broadway St, Idaho Falls, ID 83402, it’s a short and scenic drive across town. Black Bear Diner Vibe: If you're looking for classic comfort food in a cabin-like setting, Black Bear Diner is the place to go. The décor is fun and rustic, and the menu is full of generous, home-style meals. It’s the perfect, no-fuss spot for a casual and cozy dinner. Distance: You'll find them at 1610 E 17th Street, Idaho Falls, ID 83404, making it a super convenient option for anyone living near the east side of town. No matter what you're in the mood for, Idaho Falls has a cozy spot waiting for you. So this November, grab your jacket and head out for a perfect night of warmth and relaxation. Enjoy!

Read more
Fall for Idaho Falls: The Residences At First Street's Guide to the Best of the Season-image

The air is getting crisp, the leaves are starting to turn, and a certain cozy feeling is settling over the Gem State. Fall is officially here, and there's no better place to experience it than right here in Idaho Falls! Our community truly comes alive this season, with a perfect blend of outdoor adventures, festive traditions, and fun events for all ages. Here's your go-to guide for making the most of autumn around Idaho Falls: 1. Embrace the Outdoors and Chase the Colors Idaho's fall foliage is something special. The vibrant yellows of cottonwoods and aspens against the backdrop of the mountains are breathtaking. The Snake River Greenbelt: You don't have to go far to find a perfect fall stroll. The Idaho Falls River Walk, also known as the Snake River Greenbelt, offers 10 miles of paved path on both sides of the river. The changing leaves along the banks create a picturesque scene perfect for a walk, jog, or bike ride. Mesa Falls Scenic Byway: For a more immersive experience, take a scenic drive on the Mesa Falls Scenic Byway. The route, which showcases the stunning Upper and Lower Mesa Falls, is particularly magical in the fall as it's surrounded by a forest of aspens and maples in fiery shades of red and gold. Harriman State Park: A short drive from Idaho Falls, Harriman State Park is a fantastic destination for hiking and seeing the fall colors. The trails wind through a forest that transforms into a golden paradise this time of year. 2. Get Into the Harvest Spirit with Corn Mazes and Pumpkin Patches Nothing says "fall" like getting lost in a corn maze or picking out the perfect pumpkin. Luckily, Idaho Falls has some great local farms to choose from. Wild Adventure Corn Maze: This is a classic local favorite. They feature a massive corn maze with a new design each year, along with other fun activities like tube slides, a pumpkin patch, and a barrel train. New Sweden Farms: A perfect spot for families with younger kids, New Sweden Farms offers a variety of activities including a petting zoo, train rides, and a corn pit. They also have an easy and a hard corn maze, ensuring fun for everyone. 3. Explore Downtown Idaho Falls and Community Events Downtown Idaho Falls is a hub of activity in the fall, with special events that celebrate the season. Keep an eye out for these annual favorites: Idaho Falls Farmers Market: The market runs every Saturday morning through the end of October. It's the perfect opportunity to grab local produce, baked goods, and crafts, all while enjoying the crisp autumn air. Boo at the Zoo: The Idaho Falls Zoo at Tautphaus Park hosts this family-friendly Halloween event, which is always a huge hit. It’s a great way to celebrate the holiday in a safe and fun environment. Downtown Events: The Downtown Idaho Falls Development Corporation often hosts fall events like "Oktoberfest Downtown" and "Boo Brew & Crawloween." Be sure to check their calendar for specific dates and details! 4. Discover Indoor Fun on a Chilly Day If the weather takes a turn for the cooler, there are plenty of indoor activities to enjoy. Museum of Idaho: Explore the history and science of the region with a visit to the Museum of Idaho. They often have rotating exhibits, so there's always something new to discover. East Idaho Aquarium: This is a fantastic option for families, offering hands-on exhibits where you can feed birds, touch stingrays, and more. Willard Arts Center & Colonial Theater: Catch a show or view an art exhibit at one of these downtown cultural gems. The Idaho Falls Arts Council has a full calendar of events, so check out what's coming this fall. We hope this guide inspires you to get out and enjoy everything that makes Idaho Falls so special this time of year. Happy fall, everyone!

Read more
Pumpkin Carving 101: Your Guide to a Masterpiece-image

It is finally time for the ultimate fall tradition: pumpkin carving! Whether you’re aiming for a spooky ghoul or a friendly jack-o'-lantern, we’ve got you covered. This guide will walk you through the entire process, from picking the perfect pumpkin to getting those intricate details just right, all while keeping your apartment as tidy as possible.   Step 1: Picking the Perfect Pumpkin   A great pumpkin starts with a great selection! Head out to a local pumpkin patch or farmer's market to find your canvas. Look for a Flat Bottom: This is key! A flat bottom will prevent your pumpkin from wobbling and rolling away while you’re carving. Check for Blemishes: Avoid soft spots, mold, or deep cuts. A healthy pumpkin will last longer. Find a Strong Stem: A sturdy green or brown stem is a good sign of a fresh pumpkin. The Tap Test: Lightly tap on the pumpkin. A hollow sound means it's ripe and ready to be carved.   Step 2: Set Up for Success (Mess-Free Carving!)   Carving is messy, but your apartment doesn't have to be. A little prep goes a long way. Location, Location, Location: Choose an easy-to-clean surface. Your kitchen counter or a balcony table is ideal. If you're using a rug or carpet, lay down a large plastic garbage bag or an old towel to catch all the seeds and pulp. The Right Tools: You don't need a fancy carving kit! Here are some common household items that work great: Serrated Knife: Perfect for cutting the top of the pumpkin. Large Spoon or Ice Cream Scoop: The best tool for scraping out the insides. Poker or Awl: Use this to transfer your design onto the pumpkin. Small Paring Knife: Ideal for detailed cuts. Cookie Cutters: A fun and easy way to make clean shapes. Just press them in with a rubber mallet.   Step 3: The Carving Process   Time to get creative! Cut the Lid: Using your serrated knife, cut a circle around the stem. Angle your blade at a 45-degree angle. This creates a lip for the lid to rest on, so it won’t fall into the pumpkin. Scoop the Guts: Use your spoon or ice cream scoop to remove all the seeds and fibrous strands. Make sure the inside walls are smooth and clean. Pro Tip: Don't throw the seeds away! You can rinse them, toss with a little salt and oil, and roast them for a delicious, healthy snack. Trace Your Design: Print out a template from online or draw your own design on a piece of paper. Tape the design to the pumpkin. Use your poker or awl to punch holes along the lines of your design, creating a dotted outline. Start Carving: Now for the fun part! Using a small paring knife, carefully cut along the dotted lines. Work from the center of your design outward to avoid putting too much pressure on the pumpkin. Clean Up: Once you're done, wipe down the outside of your pumpkin to remove any stray bits of pulp. Place a battery-operated LED candle inside—it’s much safer than a flame!   Step 4: Make It Last   You’ve worked hard on your pumpkin, so make sure it lasts! Moisturize: Rub a small amount of petroleum jelly or vegetable oil on the cut edges to seal in moisture and prevent drying. Keep it Cool: Store your carved pumpkin in a cool, dry place when not on display. This will slow down the decomposition process. Happy carving, everyone! We can't wait to see your spooky, silly, and creative creations. Be sure to tag us on social media with your finished pumpkins!

Read more
Fall Scents: A Renter's Guide to Cozy Aromas (Without the Fire Hazard!)-image

As the leaves begin to turn and a crispness enters the air, there's nothing quite like transforming your apartment into a warm, inviting fall sanctuary. And let's be honest, a huge part of that cozy autumn vibe comes from the scents of the season – pumpkin spice, apple cider, warm cinnamon, and earthy woods. While candles are often our go-to for instant ambiance, they do come with a responsibility, especially in an apartment setting. But fear not, fellow renters! You can absolutely infuse your home with all the delightful aromas of fall without ever lighting a wick. We're here to show you some fantastic, flame-free ways to make your apartment smell like autumn dreams.   1. The Magic of Essential Oil Diffusers   If you haven't jumped on the essential oil diffuser bandwagon, now's the time! These nifty devices use water and ultrasonic vibrations to disperse a fine, fragrant mist into the air. They're incredibly safe, easy to use, and you have complete control over the intensity and blend of scents. Our Favorite Fall Blends: Pumpkin Spice: Cinnamon, Clove, Nutmeg, a touch of Ginger Crisp Autumn Air: Fir Needle, Cedarwood, Wild Orange Spiced Apple Cider: Cinnamon, Clove, a drop of Lemon or Orange Earthy Woods: Sandalwood, Patchouli, Pine Pro Tip: Look for diffusers with a timer function so you can set it and forget it!   2. Stovetop Simmer Pots: Your Apartment's Natural Potpourri   This is perhaps one of the most delightful and budget-friendly ways to make your entire apartment smell absolutely incredible. A stovetop simmer pot involves gently heating water with various aromatic ingredients, allowing their natural fragrances to waft through your home. Just remember to keep an eye on the water level and replenish as needed! Easy Fall Simmer Pot Combos: Classic Autumn: Sliced oranges, cinnamon sticks, whole cloves, star anise Apple Orchard: Apple peels and cores, cinnamon sticks, a few drops of vanilla extract Cranberry Zest: Fresh cranberries, orange peels, rosemary sprigs Evergreen Forest: Pine sprigs (from a non-toxic source!), a few bay leaves, orange peels How To: Simply fill a small pot with water, add your ingredients, bring to a gentle simmer over low heat, and let the magic happen!   3. DIY Fall-Scented Room Sprays   Do you love an instant burst of fragrance? Create your own custom room sprays! This allows you to control the ingredients and avoid any harsh chemicals often found in commercial air fresheners. What You'll Need: A small spray bottle (amber glass is best for essential oils) Distilled water Witch hazel or rubbing alcohol (helps essential oils disperse) Your favorite fall essential oils Simple Recipe: Add 1-2 tablespoons of witch hazel or rubbing alcohol to your spray bottle. Add 20-30 drops of your chosen essential oil blend (start with less and add more if needed). Fill the rest of the bottle with distilled water. Shake well before each use. Customize Your Scent: Play around with combinations like cinnamon + orange + frankincense for a warm, grounding aroma, or clove + ginger + bergamot for a spicy, uplifting blend.   4. Scented Pinecones & Potpourri   Embrace the rustic charm of fall by creating your own scented decorations! Gather some pinecones (you can bake them at a low temperature to clean and open them up) or buy a bag of unscented potpourri. To Scent: Place your pinecones or potpourri in a sealable plastic bag. Add about 15-20 drops of your favorite fall essential oil blend, seal the bag, and shake gently. Let them sit for a few days, shaking occasionally, to allow the scent to absorb. Display them in decorative bowls around your apartment for a subtle, long-lasting aroma.   Fall Safety First!   While these methods are incredibly safe, a few general reminders: Always supervise stovetop simmer pots and never leave them unattended. Keep essential oils out of reach of children and pets. Ensure good ventilation when using any type of fragrance in your home. This fall, get creative with your apartment's ambiance! By exploring these flame-free options, you can safely enjoy all the delightful scents of the season, making your apartment truly feel like a cozy autumn retreat. Happy scenting!

Read more
The Importance of Loving Where You Live-image

Have you ever paused to consider how your surroundings influence your happiness, productivity, and overall well-being? The place you call home plays a pivotal role in shaping your daily life, and loving where you live is more important than many realize. Let’s explore why loving your environment matters and how it can positively impact your life. Emotional Well-Being Your environment has a profound impact on your emotional health. Living in a place you love can bring a sense of peace, satisfaction, and joy. Whether it’s the natural beauty of the landscape, the vibrancy of a city, or the sense of community in your neighborhood, finding elements you cherish can significantl y boost your mood. Physical Health A positive environment encourages healthier habits. Living in a neighborhood with parks, walking trails, or fitness facilities can motivate you to stay active. Access to fresh food markets and health-conscious communities can also contribute to better nutrition and overall wellness. Productivity and Creativity When you love where you live, you’re more likely to feel inspired and motivated. A serene and stimulating environment can enhance creativity, while a supportive community can provide opportunities for collaboration and growth. Feeling comfortable and content in your surroundings allows you to focus on your goals without unnecessary distractions. Social Connections A place you love often includes people you enjoy being around. Building relationships with neighbors, participating in local events, or simply feeling a sense of belonging can deepen your connection to your community. Strong social ties are linked to improved mental health and a greater sense of purpose. Long-Term Satisfaction Loving where you live fosters a sense of pride and commitment to your community. It’s easier to invest time and energy into a place you care about, whether that’s through volunteering, supporting local businesses, or contributing to neighborhood improvement projects. These efforts not only benefit your area but also enhance your own sense of fulfillment. How to Cultivate Love for Where You Live If you’re not currently in love with your location, all hope is not lost. Here are a few steps to help you nurture a stronger connection: Explore Your Surroundings : Seek out hidden gems in your area, such as parks, cafes, or cultural landmarks. Sometimes, a fresh perspective can reignite your appreciation. Get Involved : Join local groups, attend events, or volunteer. Engaging with your community can make it feel more like home. Personalize Your Space : Transform your home into a sanctuary that reflects your personality and brings you joy. Focus on Gratitude : Make a list of things you appreciate about your area, no matter how small. Gratitude can shift your mindset and help you see the positives. Consider a Change : If all else fails and your environment consistently affects your well-being, it might be time to consider relocating. Life is too short to settle for a place that doesn’t make you happy.   Loving where you live is not just about geography—it’s about finding a space that nurtures your spirit, supports your goals, and enhances your quality of life. Whether through small changes or big moves, investing in a place you love can transform your daily experience and set the stage for a more fulfilling life. Remember, your environment is the foundation of your journey; make it one you cherish.  

Read more